Installing on Windows
CrystalSolutions, SoleTrader and PraxisClinic run on your own Windows PC, so your records stay on your computer. Pick the route that suits you.
A. Easy install with Docker
Double-click an installer and Docker sets up the web server, PHP and the database for you. A few minutes once Docker is installed.
Choose this if you want it running quickly, with nothing to configure.
StandardB. Standard install with XAMPP
XAMPP is a free Windows program that provides Apache, PHP and MySQL. You copy the files in, then a web installer walks you through the setup.
Choose this if you prefer not to use Docker, or want to see and edit the files directly.
Not sure? Choose A. You can always move to B later, because your records can be exported and imported.
- Always extract zips before using them. Double-clicking a zip in Windows only lets you peek inside it, and things run from in there don't work properly. Right-click the zip, choose Extract All…, then Extract, and use the new folder that appears.
- "Do you want to allow this app to make changes?" This box appears whenever something installs. Check the Verified publisher line names who you expect (for example Docker Inc.), then click Yes.
A. Easy install with Docker
- You need Docker Desktop, a free program that runs the software. Steps 1 to 3 below cover installing it. If it's already installed and running, skip to step 4.
- You have downloaded your installer zip, for example
SoleTrader_Docker.zip. Step 4 shows how to unpack it.
-
Download Docker Desktop
Go to docker.com and choose Download for Windows (AMD64). Most PCs need this one; ARM64 is only for a few newer thin laptops. Then open the downloaded installer from your Downloads folder.
-
Choose "All-users installation" with WSL 2
Docker's installer asks how to install. Choose All-users installation, keep WSL 2 selected beneath it, and leave Allow Windows Containers unticked. Click OK, and Yes when Windows asks to allow changes.
Don't choose "Per-user (Recommended)". On a new PC it can't switch on a Windows feature Docker needs, and the installation fails.
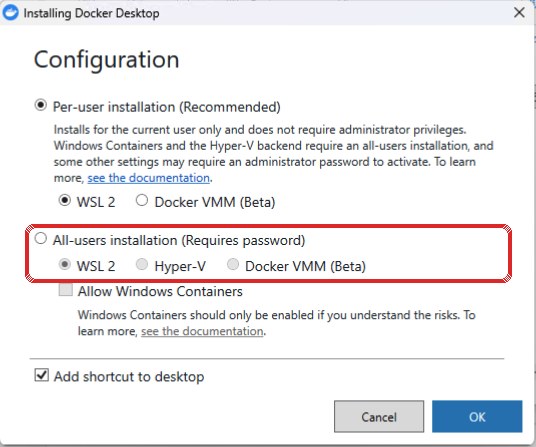
Choose the option outlined in red: All-users installation, with WSL 2. -
Restart, accept the terms, and press a key in the black window
When the installer finishes, click Close and restart. After the restart Docker Desktop opens by itself and shows its terms. Click Accept. Docker is free for individuals and small businesses; the paid plans are only for companies with more than 250 staff.
Then look behind it. A black window may be waiting, saying "Press any key to install Windows Subsystem for Linux". Click in that window and press any key (Enter is fine). It installs a small part of Windows that Docker needs. Let it finish, and click Yes if Windows asks to allow changes. If it asks you to restart, do.
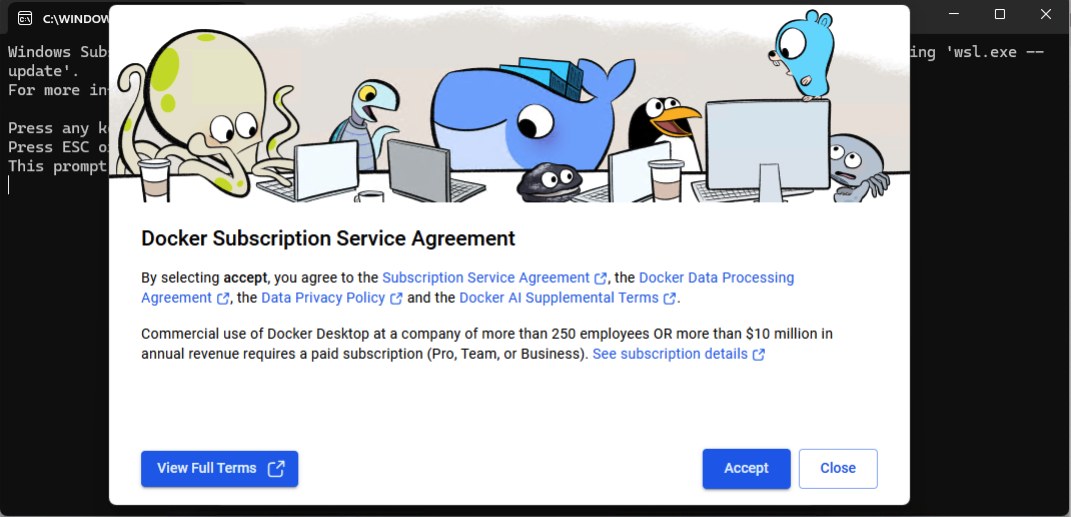
Click Accept, then press a key in the black window behind it. If a "Welcome to WSL" window appears, that means it installed successfully. Just close it with the × at its top right.
Docker will offer to create an account. You don't need one. Choose Skip (or Continue without signing in). You can also ignore the Sign in button at the top of Docker's window.
Docker is ready when its window shows the Containers page, saying "Your running containers show up here".
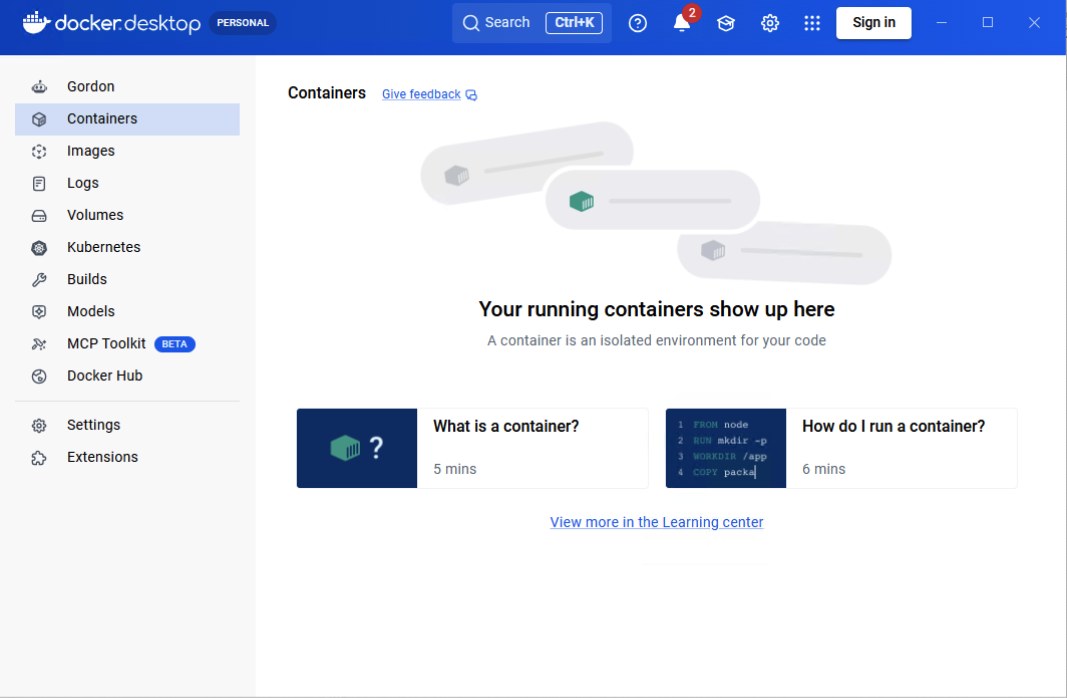
Docker Desktop, installed and ready. -
Extract the installer zip
Find the zip you downloaded (usually in Downloads). Right-click it and choose Extract All….
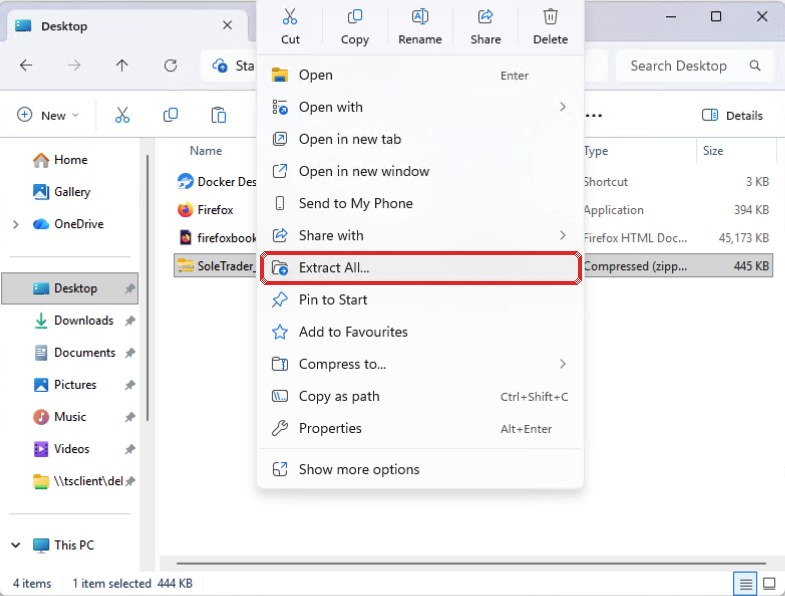
Right-click the zip and choose Extract All… Windows suggests a folder with the same name, next to the zip. That's fine: click Extract. The installer copies the software to a place you choose in a moment, so it doesn't matter where you extract it.
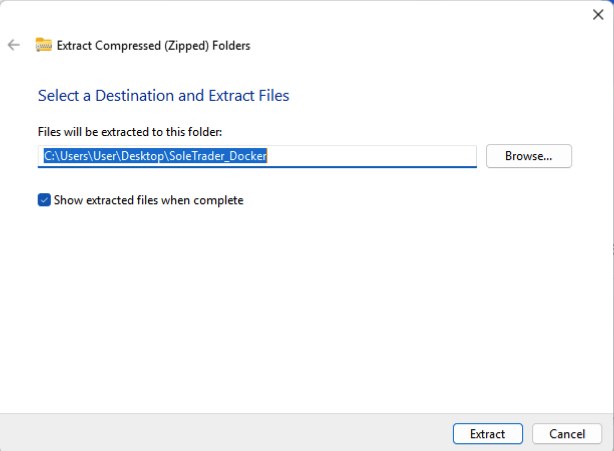
Click Extract. You'll now have two items with the same name, for example SoleTrader_Docker. Use the plain yellow folder (its Type is File folder), not the zip.
-
Double-click the installer
Inside the extracted folder is a folder with your product's name, for example SoleTrader. Open it, and double-click Install SoleTrader (or Install CrystalSolutions, Install PraxisClinic).
Windows hides the endings of file names, so it shows as plain Install SoleTrader. You can tell it's the right one because the Type column says Windows Batch File. Ignore the files ending .command: those are for Macs.
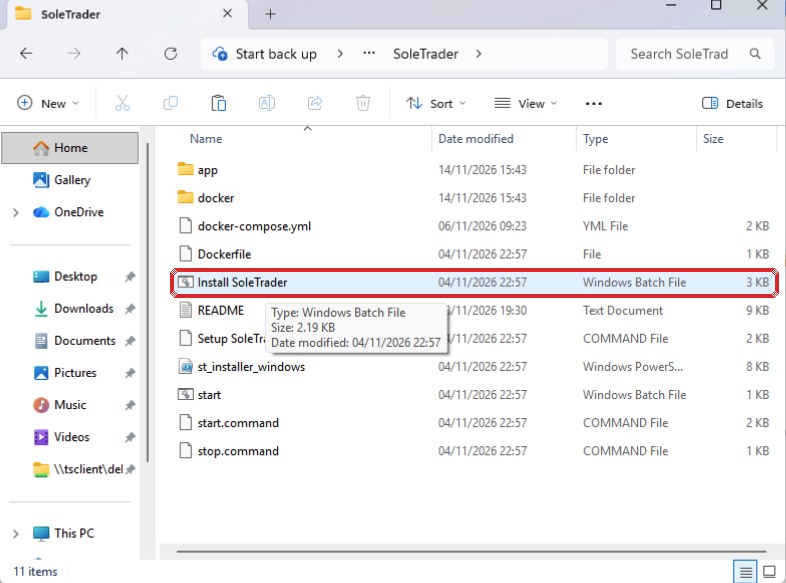
Double-click Install SoleTrader, the Windows Batch File. Windows will warn that "The publisher could not be verified". That's normal for small software makers who don't pay for Microsoft's signing service. Click Run.
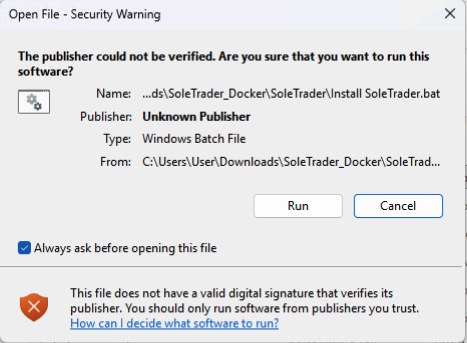
Click Run. On some PCs it's a blue box instead, saying "Windows protected your PC". Click More info, then Run anyway.
-
Type 1, then press Enter
A black window opens. It reminds you that Docker Desktop must be running: press any key to continue. Then it shows a short menu. Type 1 (First install), then press Enter. Nothing happens until you press Enter.
A small window then asks where to install. Documents is a good choice. The installer creates a folder with your product's name inside it, and that becomes your installed copy, so don't move or rename it afterwards.
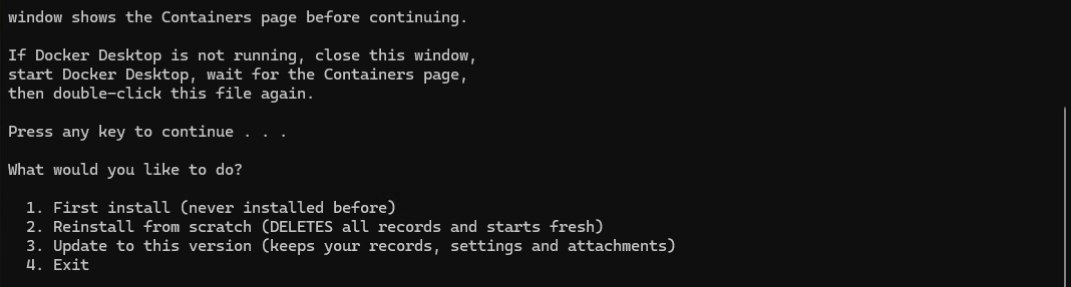
The menu. For a new installation, type 1 and press Enter. 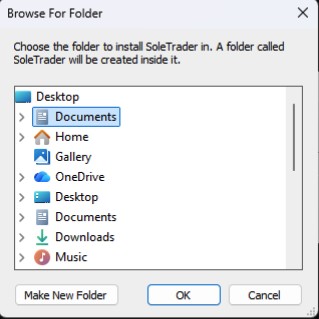
Documents is already selected: just click OK. -
Wait while it builds: several minutes
The progress window shows what's happening. The first install takes 3 to 5 minutes, because Docker downloads the database and web server, and the bar may sit still for a while. That's normal: leave it be.
Windows may ask whether to let Docker Desktop Backend through the firewall. Tick Private networks, untick Public networks, and click Allow. (Windows ticks Public by default; your software only needs your own PC and home network.)
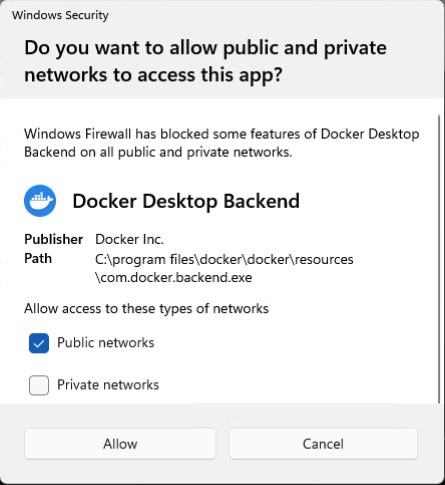
Tick Private networks, untick Public networks, then Allow. -
Log in
When it's finished, a message gives your address and first login details, and your browser opens the software.
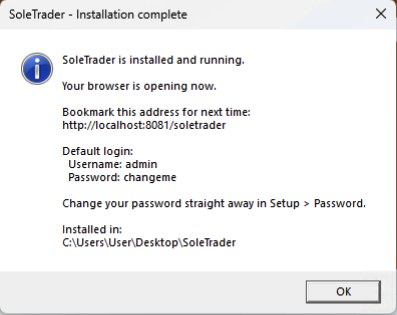
Note the address and login, then click OK. 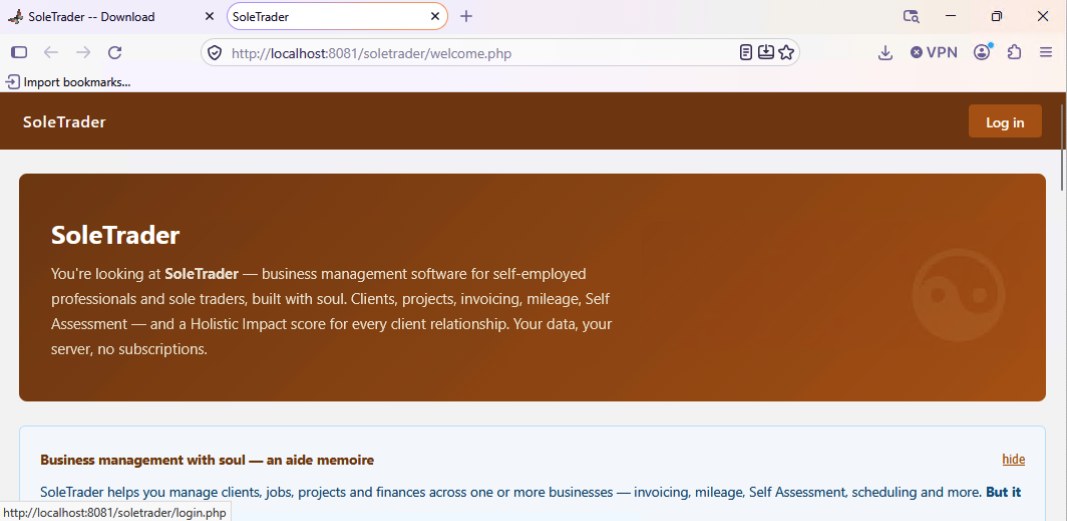
Click Log in and use adminandchangeme.Change the password straight away in Setup → Password.
Close the black installer window (or press any key in it). Once it's all working, you can delete the downloaded zip and the extracted folder: your installed copy is the one in the place you chose.
Addresses and ports
| Product | Open it in your browser at |
|---|---|
| CrystalSolutions | http://localhost:8080/cspractice |
| SoleTrader | http://localhost:8081/soletrader |
| PraxisClinic | http://localhost:8082/praxis |
Bookmark the address. You can install more than one product on the same PC, because each uses its own port.
Day to day
Docker Desktop needs to be open and your product running for the software to work. Open Docker Desktop, go to Containers, and press the play button next to your product if it isn't running.
To have it start by itself, open Docker Desktop's Settings (the cog at the top right) → General, and tick Start Docker Desktop when you sign in to your computer.
Updating to a new version
Download and extract the new zip as above, run Install SoleTrader from it, and choose 3. Update to this version. When it asks where SoleTrader is installed, choose the folder that contains your SoleTrader folder (usually Documents). Your records, settings and attachments are kept.
Option 2 (Reinstall from scratch) deletes everything and starts again. It asks you to type YES first, so it can't happen by accident.
Docker install questions
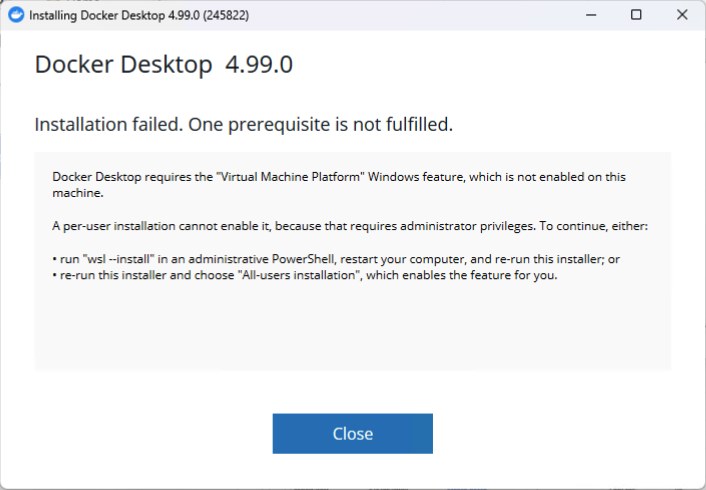
Docker says "Installation failed. One prerequisite is not fulfilled"
You chose Per-user installation. Close the message, run the Docker installer again and choose All-users installation with WSL 2.
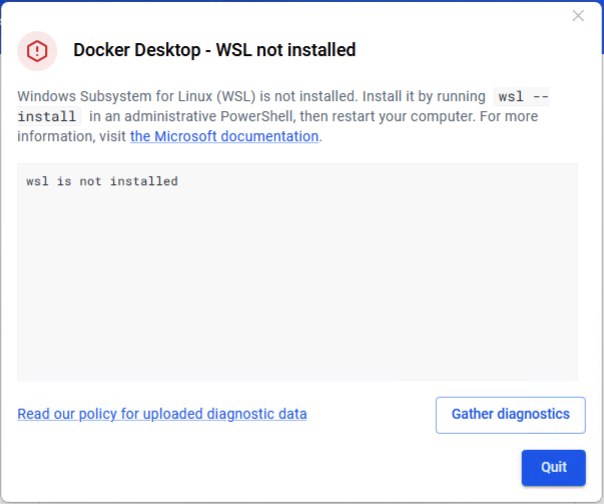
Docker says "WSL not installed"
The black "press any key" window was missed or closed before it finished. Easy to fix:
- Click Quit on Docker's message.
- In your extracted installer folder, double-click
Prepare Windows for Docker.batand click Yes when Windows asks to allow changes. If Windows shows "Windows protected your PC", click More info, then Run anyway. - Wait for it to say Finished, then restart your computer and open Docker Desktop again.
Prepare Windows for Docker.bat, then restart.Comfortable typing a command? Instead of the file, right-click the Start button, choose Terminal (Admin), type wsl --install --no-distribution, press Enter, then restart.
Docker says virtualization isn't enabled
A setting in your PC's start-up options (the BIOS) needs switching on. It's usually called Virtualization, Intel VT-x or AMD-V. How you reach it varies by make, so search for "enable virtualization" plus your PC's make and model, or ask whoever looks after your computer.
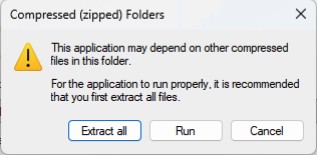
Windows says "This application may depend on other compressed files"
You've opened the zip and are looking inside it, rather than at an extracted folder. (A giveaway is the Compressed size and Password protected columns.) Click Extract all, then Extract, and run the installer from the new folder that opens.
Double-clicking the installer opens a window that closes straight away
You're probably running it from inside the zip. Right-click the zip, choose Extract All, and run the installer from the extracted folder.
Nothing happens after the installer finishes
Open Docker Desktop and check that your product is listed under Containers and is running, then open the address in the table above.
Can I move or rename the installed folder?
No. Docker remembers where it was installed, so moving or renaming the installed folder (the one you chose during installation, for example Documents\SoleTrader) stops it working. The zip and the extracted folder you ran the installer from can be deleted.
B. Standard install with XAMPP
- Download the Standard zip for your product from our website and extract it (right-click → Extract All). You'll get a folder named
cspractice,soletraderorpraxis. - Download XAMPP for Windows from apachefriends.org and run its installer. Keep the suggested install folder,
C:\xampp. If it warns about User Account Control, click OK: installing toC:\xamppavoids that problem.
-
Start Apache and MySQL
Open the XAMPP Control Panel (from the Start menu) and click Start next to Apache and next to MySQL. Their names turn green. If Windows asks whether to allow them through the firewall, choose Allow.
-
Copy the files in
Copy the whole extracted folder into XAMPP's
htdocsfolder, which is atC:\xampp\htdocs. In File Explorer, paste that path into the address bar at the top, press Enter, and drag your folder in.Keep hidden files. The folders contain files whose names start with a dot (
.htaccess). They protect your private files, so copy the whole folder in one go rather than picking files one by one, and don't delete them. -
Create the database
In the XAMPP Control Panel, click Admin next to MySQL (or open
http://localhost/phpmyadmin). Choose New, type the database name from the table below, and for collation chooseutf8mb4_unicode_ci, then click Create. -
Run the installer
Open the installer address from the table below in your browser. For the database use host
localhost, usernameroot, and leave the password empty (XAMPP's default). The form also asks you to choose your own admin username and password (at least 6 characters), so write them down.The installer's checks include "Private folders protected". Anything other than a tick means the
.htaccessfiles aren't working, so check the folder was copied whole. -
Delete the installer
When it finishes, delete the installer file (
…_install.phporsetup_wizard.php) from the product's folder, as the installer reminds you. Then log in and change your password in Setup → Password.
| Product | Folder in htdocs | Database name | Installer address |
|---|---|---|---|
| CrystalSolutions | cspractice | crystalsolutions | http://localhost/cspractice/cs_install.php |
| SoleTrader | soletrader | soletrader | http://localhost/soletrader/st_install.php |
| PraxisClinic | praxis | praxisclinic | http://localhost/praxis/praxis_install.php |
Day to day
The XAMPP Control Panel must be open with Apache and MySQL started (green) for the software to work. Bookmark your product's address without the installer part, for example http://localhost/soletrader.
Next: try it with sample data
To see how it works before entering your own records, you can add made-up sample data using phpMyAdmin (open it from the Admin button next to MySQL in XAMPP) and remove it again afterwards. The steps are the same on Windows.
The sample records count towards the trial's 10-record limit, so remove them before you add your own.
Apache won't start, or its name stays red
Another program is probably using port 80. Quit it, or in the XAMPP Control Panel click Config next to Apache to change the port. If you change it to, say, 8080, add :8080 after localhost in every address on this page.
The installer can't connect to the database
Check MySQL is started (green), the host is localhost, the username is root and the password is empty. Also check you created the database first.
Your records stay with you. Everything is stored on your own PC. Keep your own backups, and see the README in the install folder for how.
Do you use a NAS to back up your PC? You can also install our software on that.
Many people use a Network Attached Storage (NAS) box such as a Synology or QNAP to copy and protect their data, but did you know you can also run our software on it? It could save you a monthly subscription to cloud software that doesn't give you complete control of your own data. See our product-specific install guides for more on this, and on installing on your own web server if you have one.